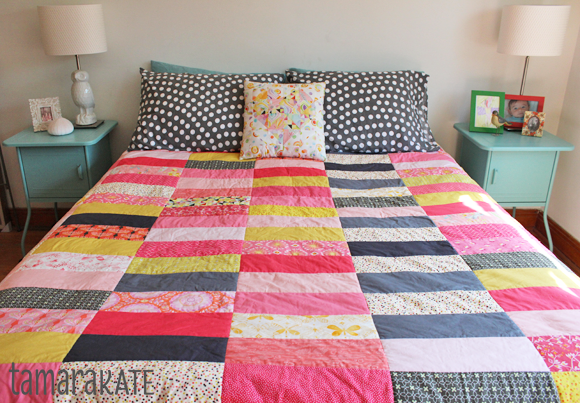
The Railroad Quilt: A Beginner’s Quilt
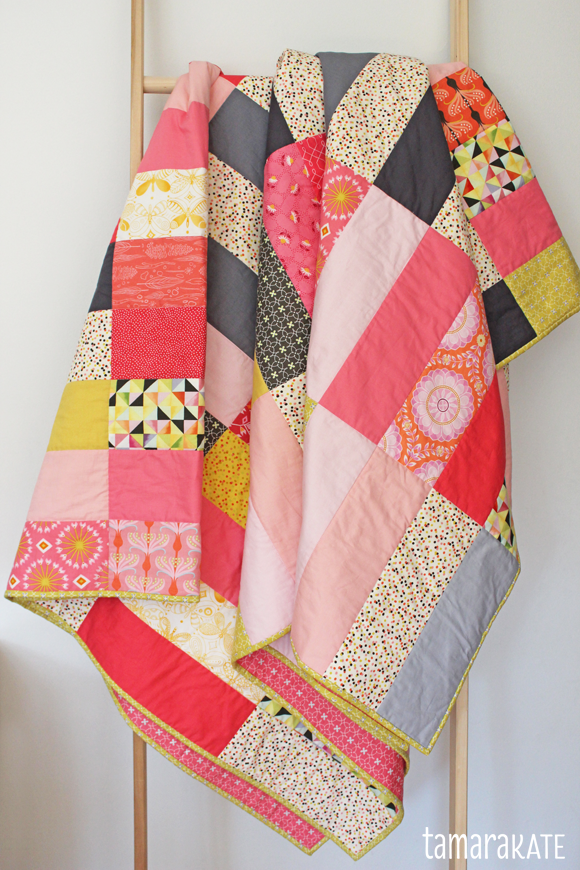
I hear from a number of you pretty regularly that you’d love to make your first quilt, but don’t know where to start, or you’re intimidated. Well, this Railroad Quilt is the perfect first project. It is a quilt that is all about colour and fabrics. It involves easy cutting and piecing, but still has good graphic impact and you can have lots of fun playing with your favourite colour palette.
I’ve chosen throughout this post to highlight some of my favourite easy quilt sewing features of this fantastic Janome sewing machine I have the pleasure of using, as I had promised you that, from time to time, I would update you on what a joy it is to use.
I suggest reading through the whole post before diving in so that you understand the entire process.
The measurements given create a queen size quilt.
What I used:
– ¼ yard to ½ yard (based on your favourites) of fabrics from your 4 main groups listed below (½ yards for main fabrics in both “dark” and “light” categories)
– Queen size / 88″ x 92″ quilt batting
– Backing fabric totalling 88″ x 92″ (as discussed below)
– 1yd binding fabric
– thread, curved quilt pins, masking tape (or painter’s tape), rotary cutter, acrylic ruler, cutting mat (as discussed below)
What I did:
Let’s start with something fun… CHOOSING FABRICS:
For this quilt, I chose a mix of Michael Miller fabrics, mostly from my own Helen’s Garden and Flight Patterns collections, a few from fellow designer Patty Sloniger’s sweet Emma’s Garden collection and some yummy Cotton Couture solids. I stayed within 2 main colour groups, one a bit more dominant than the other (pink – dominant & yellow – secondary) along with a dark and a light (charcoal and cream). You can use whatever colours you like. Within all four of these groups, I used a combination of solid and patterned fabrics.
DOMINANT – PINKS: Keeping to the warm side of the pinks, verging on corals, I chose 4 solids, ranging from bright & bold to the palest shades, along with a slew of patterned fabrics that again run the gamut of vibrant to soft and everything in-between.
SECONDARY – YELLOWS: I used 1 solid and only 3 or 4 patterned fabrics, with only one being very vibrant (I know they all look pretty vibrant in the above photo, but scroll down a bit for something much closer to reality).
DARK – CHARCOAL: 2 solids & 1 patterned fabric
LIGHT – CREAM: 1 main patterned fabric (cream with dots). Sometimes a fabric can be used in multiple roles in a quilt. I used a bit of the softest pink solid to replace cream in some spots, as well as a few soft pinks or yellows on white grounds. An easy tip for choosing these: when you squint at this group of fabrics, you want them all to read as being around the same light value.
A few very brief TECHNICAL QUILTING TIPS:
CUTTING YOUR FABRICS: Consistency in cutting goes a very long way to having reliable, clean piecing results. The best 3 tools to achieve this are a rotary cutter, a generously sized cutting mat and a clear acrylic ruler. If you are only going to purchase one ruler to begin with, I strongly suggest a 6½” x 24″ one. This should have 45° & 30° markings on it, and you will be amazed at the number of types and sizes of quilt pieces you can cut with it. You can cut multiple pieces at a time using these tools, saving lots of time.
SCANT ¼” SEAMS: The “scant” part takes a bit of practice, but then it becomes automatic. It just means you want to have a seam that is always just shy of 1/4″ (to compensate for that tiny bit of extra fabric that gets taken up when you press your seams). There are easy tools to help you achieve a constant 1/4″ seam, the simplest of which is a 1/4″ presser foot.
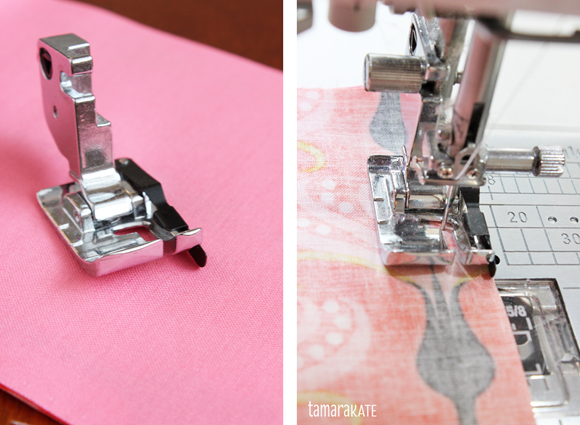
Above is the 1/4″ foot that comes with the Janome MC8200 that I sew with. The black strip of metal along the right edge holds the fabric at exactly 1/4″ from the needle at all times.
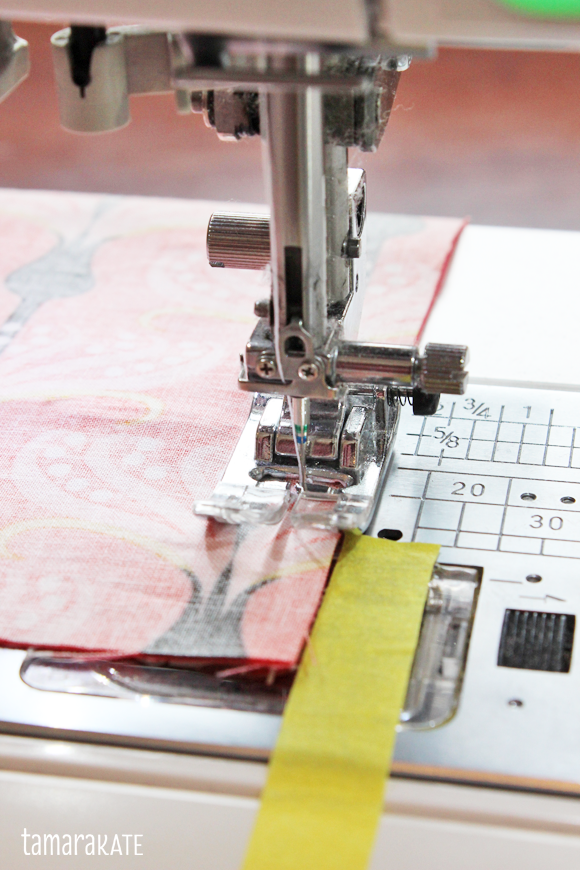
If you don’t have a 1/4″ foot on your machine, you can still make it easy for yourself using the basic foot. Because the 1/4″ seam measurement will be under your presser foot (and thus hard to see), you can add a strip of masking tape to the machine surface along the 1/4″ measurement that will give you a strong visual line along which to run your fabric. Easy as that!
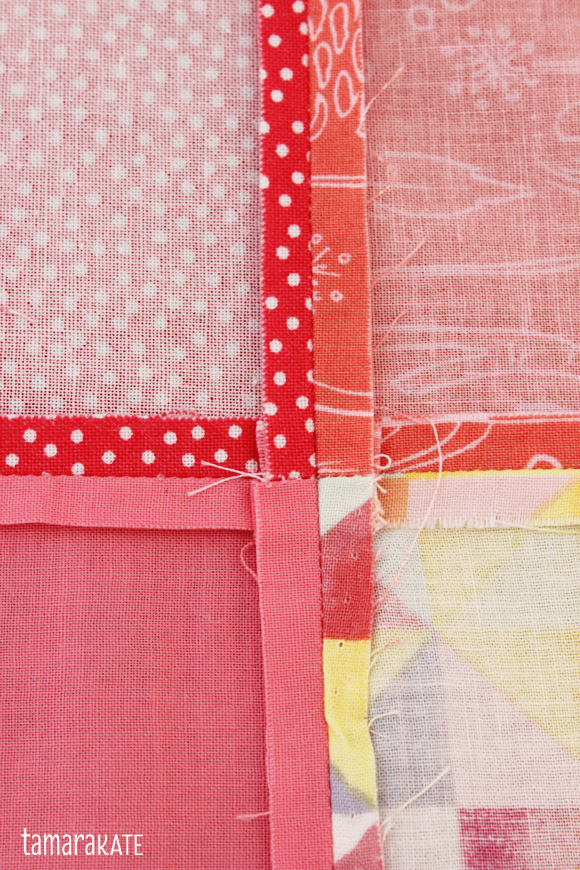
PRESSING YOUR SEAMS: The quilting community is divided in opinion of the best direction to press seams. Either in one direction or open. I use both methods depending on the project, but tend more toward pressing open, which is the method I use in the Railroad Quilt. I find it more efficient to avoid extra bulk where seams intersect and, for me, it’s easier to get seams to line up properly.
Now, on to LAYOUT, CUTTING & PIECING:
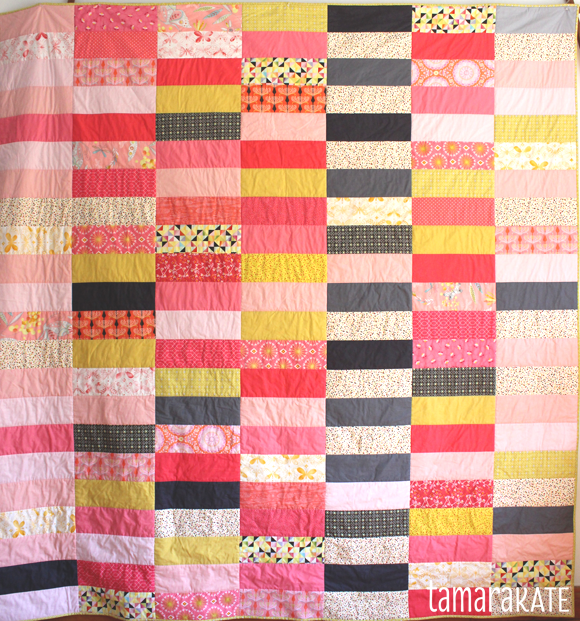
The Railroad Quilt is made up of 4½” x 12½” rectangles. When sewn together, they will be 4″ x 12″. Couldn’t be simpler!
The quilt is comprised of 7 columns of 22 rectangles as follows:
– The 2 exterior columns are made up of lots of the softer fabrics from the CREAM category, interspersed with the odd hit of something a bit stronger.
– Working from the left, columns 2, 3, 4 & 6 are a random mix of PINKS & YELLOWS, with the occasional CREAM and CHARCOAL piece stuck in.
– Column 5 alternates CHARCOAL & CREAM fabrics the entire length of the column.
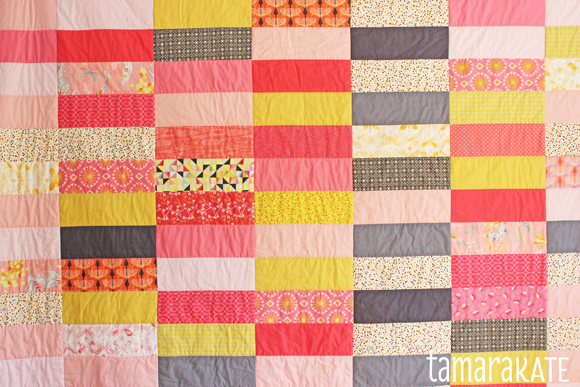
Here is an example of fabrics I pulled for one of the PINKS & YELLOWS columns:
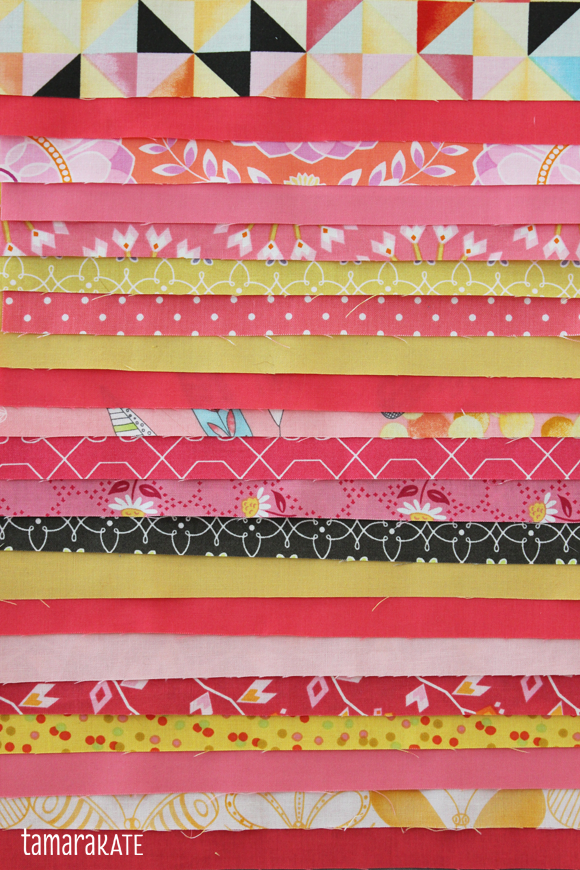
Just start cutting fabrics (aligning your ruler with the straight grain of your fabric) and laying them out in a large open space (I use my living room floor for larger projects like this). Don’t be afraid to move things around, insert a few pieces of something unexpected (keeps it dynamic) and even eliminate fabrics that just aren’t working, until you are happy with the overall look.
Gather pieces, one column at a time, keeping them in their correct order. Sew together along the long edges, respecting the 1/4″ seam. Press seams open.
When all columns have been sewn & pressed, stitch them together, trying your best to align seams throughout. You can pin them if that’s easier for you, but I find it works well to align each seam with its partner as I come to it. Press seams open.
Your quilt top is complete!
The BACKING:
If you are lucky enough to find some extra wide fabric that co-ordinates with your top for backing your quilt, fantastic! You can use one whole piece (a friend of mine buys king sized flat sheets for this purpose). More likely than not, however, you will have to piece a few fabrics together. You could use all the same fabric, 2 or more co-ordinating ones, or you could even do something more creative and pull some element / elements from your quilt top that you’d like to highlight on the back. For this one, for example, you could create another long column of rectangles to place strategically where you wish on the back, or just a band of your favourite fabric between 2 other larger pieces. The possibilities are endless. Just be sure to make the back at least 3″ larger all the way around than the top and follow the same sewing & pressing tips as you did for the quilt top.
SANDWICHING & QUILTING:
Having made sure your back & top are perfectly pressed, find a clean floor space that’s large enough to accommodate the entire quilt. First lay out the back, wrong side up. Using masking tape (or painter’s tape), tape all 4 edges to the floor (one side at a time, then opposite side. Tug slightly to flatten out lumps, but don’t stretch), smoothing out your fabric as you go & keeping your sides straight. Next comes the layer of batting. Your batting should be slightly smaller than your backing and slightly larger than your quilt top. Again, smooth as you go so you have a perfectly flat layer (no need to tape here). Now the quilt top, right side up. Again, carefully smooth out this layer, keeping seems and sides straight with the quilt top centred on the other 2 layers. Pin with quilt pins every 3″ or 4″. Consistency here will help your layers from shifting as you quilt.
You can either hand quilt or machine quilt. Hand quilting (with hand quilting thread or size 8 pearl cotton for a more pronounced look) is the way I started and I still love it, but it’s not for everyone. I enjoy the slow, meditative process, but most quilters I’ve met want something speedier. Hand quilting results in a nice soft quilt.
Hand quilting with Pearl Cotton on my Rainbow Charm Quilt
If machine quilting, using a walking foot is the easier option. Free motion quilting (stitching fine curves, small circles or intricate shapes) takes practice, so you want to spend some quality time getting smooth results on scrap fabric and batting before jumping into your first project. Regardless of which method you choose, you will need a special foot for your machine, otherwise if you use a regular foot, your quilt layers will shift as you sew which will result in fabric bunching, lumps and bumps and endless frustration.
For a first quilt, I would suggest using a walking foot and doing straight-line quilting. This will get you used to the quilting process and then you can jump to something more adventurous for your next project.
Simple straight-line quilting on my Fiesta Lap Quilt.
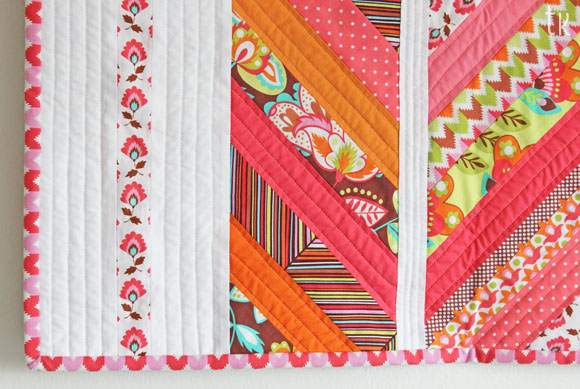
The easiest option would be stitching in the ditch (stitching in the seam channel between 2 pieces of fabric), thus not having to measure or mark lines. You will simply follow the straight lines you have already sewn throughout the quilt. Start just off the quilt top on one side, continuing to just off the top on the opposite side & repeat at each seam. This results in “invisible” quilt lines, letting the fabrics and piecing shine. I used this technique (though I plan on adding some hand quilting over time to specific blocks for a bit of added texture) and the quilt is lovely and soft, perfect for cuddling up with.
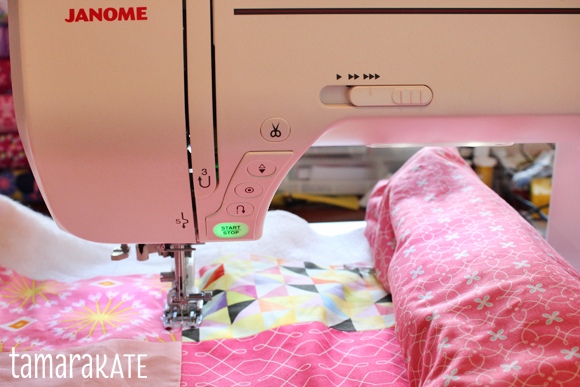
Stitching in the ditch with a walking foot. Note the quilt is rolled at the right.
Maneuvering the bulk of your quilt through the throat space (space to the right of your needle) of your machine is achieved by tightly rolling the quilt up to just beyond where you need to sew, then feeding the roll through (see above photo). This is made easier by sewing machines made especially for quilters that have a larger throat space, like the one I use, but I started on a regular domestic machine and it takes a bit of effort, but it’s doable.
If you would like to have your quilt lines show, the easiest way would be to use your presser foot as a guide. Start at the edge of one of the centre seams, running the outside edge of your foot along one of the seam lines all the way to the opposite edge, removing pins as you come to them. For the next line, align the edge of the foot with the previously sewn line and continue in this fashion for half the quilt, then flip it around and do the other half. This results in a much sturdier quilt that does not have the softness and drape of the previous technique.
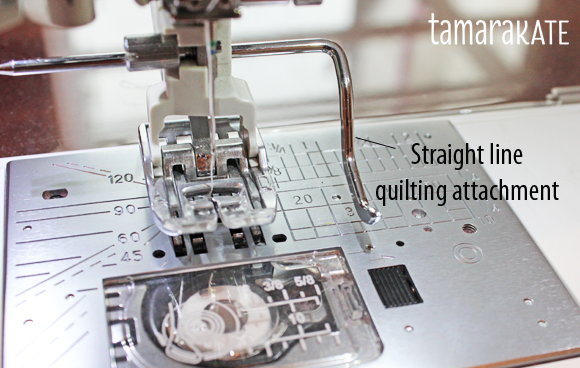
Janome walking foot with attachment for quilting straight lines.
If you would like your lines farther apart, the easiest way is to make use of an attachment like this one that fastens to the walking foot on my Janome. It glides across the top of the fabric over a previous stitch line, dictating where the next row will be stitched.
Each type of quilt batting (I like using a 80% cotton / 20% polyester blend) has different specs as to maximum space between quilting lines. Read what yours suggests and follow those guidelines. You don’t want to do all this work and end up with something that bunches or shifts when it’s washed.
SQUARING UP & BINDING YOUR QUILT:
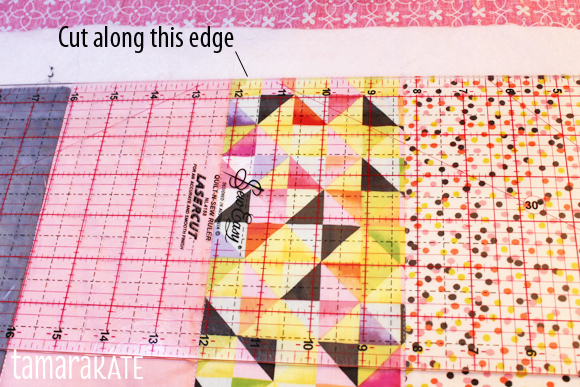
Squaring up a quilt involves cutting off the excess batting & backing fabric around the edges and making sure your sides are straight and corners are right angles. Use your acrylic ruler and rotary cutter right all along the outer edge of the quilt top to accomplish this.
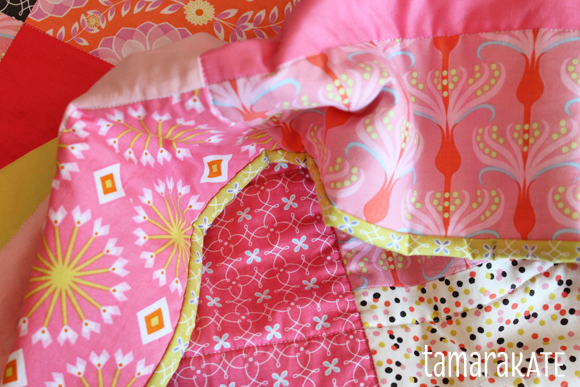
You’ve reached the last step. Again here, there are many different ways to bind a quilt, but the most often seen one is to do a thin binding that you first sew by machine to the front of your quilt, then flip to the back and hand stitch in place.
Cut your binding fabric down to 9 strips of 2¼” x WOF (width of fabric).
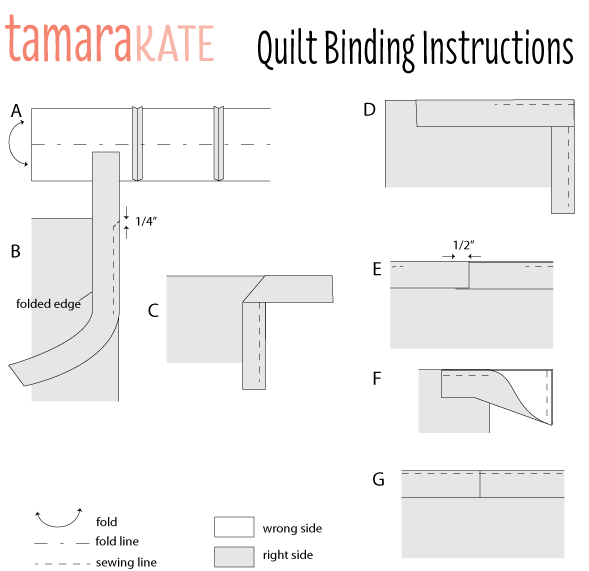
A – Sew these strips together, short end to short end, forming one long piece. Fold in half, lengthwise and press. B – Place the binding on top of the quilt, aligning the raw edges. Using a walking foot and a ¼” seam allowance, sew the binding to the quilt, starting about half way along the quilt bottom, leaving a tail of binding approx. 10″ unattached at the beginning. Sew to ¼” before the corner, stop with your needle down, raise the presser foot and turn 45º toward the corner. Sew off of quilt. C – Fold binding along the 45º angle just created. D – Refold so binding is now heading along adjacent edge, with fold at previous quilt’s edge. E – Continue sewing around quilt in this fashion until you are about 8″ from start point. Remove quilt from machine. Cut right end of binding straight, directly between where both sewing lines stopped. Lay left piece of binding on top of right. Measure exactly ½” from cut line of right piece and cut left piece. F – Open both ends of binding and place right sides together. Sew ends together with a ¼” seam. Press seam open. G – Refold binding closed and sew in place. Flip binding to back of quilt and sew in place with a needle and thread (matching binding colour) with an invisible stitch all the way around.
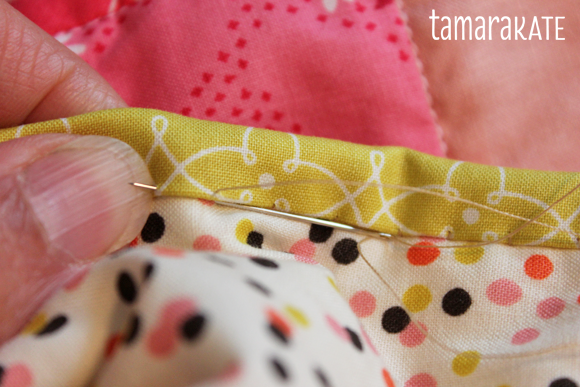
Invisible stitching binding to back of quilt.
Your quilt is now finished. Congratulations! Toss it on your bed and enjoy!


2 Comments
Valorie
June 2, 2015A beauty!
Tamara
June 2, 2015Thanks Valorie! Sometimes simple is just right.